2022 - THEC64 Mini/MAXi/A500... Add UART/BACUP the NAND
May 3, 2018 19:10:38 GMT
gurce and mrrockitt like this
Post by spannernick on May 3, 2018 19:10:38 GMT
THEC64 MAXi/Mini modding: Add UART -A "little" guide 
THEA500 is now added...
EDIT: June 2022
This has been updated for THEC64 Maxi now and it works the same way as if you were doing it on THEC64 Mini, anything that you do on THEC64 Maxi you can do on THE VIC 20 too, all 3 machines are the same machine, THEC64 Maxi and THE VIC 20 are based on THEC64 Mini so uses the same firmware.
I have added how to restore your THEA500 at the end of this thread.
Okay, here's a little tutorial on what you need to do to add a UART and a USB2 Serial (You can add or edit games with PCUAE, the only part that important in this now is the UART part for backing up your nandb or restoring it, more info on restoring your THEC64 nand here.
The following hardware is required:
For THEC64 Mini/Maxi/VIC20 and THEA500.
- An FTDI / UART USB2 Serial adapter.
There are loads on eBay.
WARNING.. ALWAYS GET A USB2SERIAL ADAPTER WITH A JUMPER OR SWITCH BUT NOT ALL CHANGE THE VOLTAGE ON THE RX LINE SO CHECK IT FIRST, MAKE SURE ITS 3.3V.IF ITS AT 5V WHEN CONNECTED TO THEC64 MINI THEN IT WILL BLOW THE UART ON IT.IT MIGHT SEEM TO BE OK BUT THEN THE UART WILL STOP WORKING..THIS INCLUDES THEC64 MAXi TOO.
I know it happened to me with one of my THEC64 Mini's.
Edit 2022: I now use a CP2102 Module USB2Serrial Adapter with TheC64 Mini/VIC20, I used it for my Gotek Drive so I could flash it for the Amiga and its has a pin for 3.3v so this works fine so I recommend it, its RX is 3.3v.
h3droid.com/blog/uart-cable
What I did was... I got a USB2serial with a cable on it like the image below so I could use the cable from it with the CP2102 USB2seral Adapter, its a good idea to do that, the cable that comes with the CP2102 USB2seral Adapter was to short and thats if it comes with one, not all do.

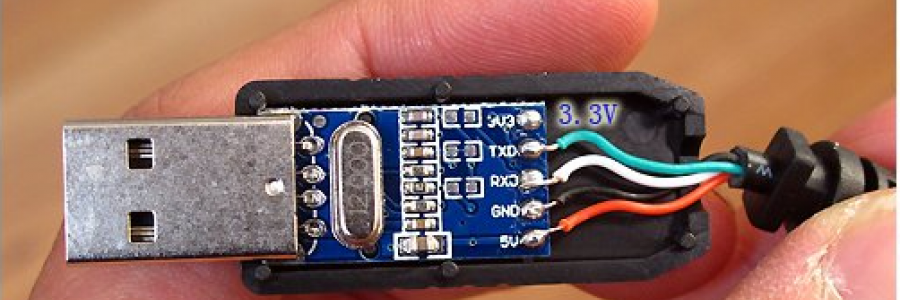
You will need to take the cable off so take apart the USB2Serial with the back cable on it, so unsolder it and then get 3 cables with the jumper connectors on so you can solder wires to each cable on the black cable (Green, White and Black wires) DO Not use the RED wire, its not needed so cut it off so you can not use it, then you can connect the black cable to the CP2102 USB2seral Adapter.
Look here on eBay for a CP2102 USB2Serial Module USB to TTL UART Serial Converter, try to find one with a jump cable ... I HIGHLY RECOMMENED IT...
This is like the one I use, it comes with the jumper cable you need to connect the black cable to.

For THEC64 Mini/Maxi/VIC20
- Pin header 2.54mm RM for the UART connection on the C64 Maxi/Mini board (4 pins) + soldering iron.
Recommend a 90 ° bar, because it is always easy to plug in the connector and you can close THEC64 Mini/Maxi/THEVIC20 case once you have fitted the UART Cable.
When soldering the 4 pin on the C64 Maxi/Mini board do not leave the soldering iron on the pads to long because you could damage the traces on the board and the serial will not work, just about 2 seconds on each pad and solder the pins on, one at a time.
You need a 4 pin header like this below but only really need 3 pins for Rx, Tx and Gnd holes.

- A USB stick with Fat32 and MBR partition / formatted
- A C64 Mini, THEC64 MAXi or THEA500
The following software is required..
- Windows 7,8,10 sorry not for Linux atm.
- Putty (or another Terminal Program)
putty.org
And now we can start...
On THEC64 Mini
First, the C64 mini must be opened, there are 4 screws under the rubber feet. Take care when removing the cover as the cable of the LED is rather short and thin and can break easily. The cable can then be removed from the board, just as the cable that leads to the hidden button in the case - you have to be more careful because its soldered badly, so the cable can come off the button,In case, solder cable again : P
The board is held only by 4 screws on the case and can be unscrewed quickly.
Then you have to solder the pins on the board and then you can screw it back firmly. You do not have to do any more.
Looks like this:
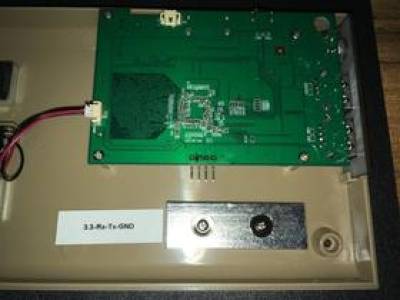
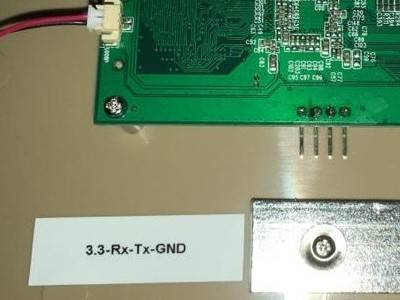
On this picture you can also see how the solder points are from left to right on THEC64 Mini board.
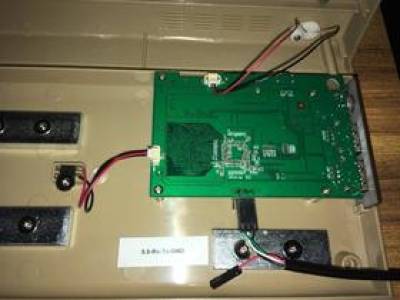
Next you connect the UART adapter to the C64 mini to...
On THEC64 MAXi
You need to flip the case over, There are 3 screws in THEC64 Maxi and you need to unscrew them to get to its board.
You don't have to do this, you can still add a Uart with THEC64 Maxi with the keyboard and Led light plugged in, I just say remove the keyboard and LED plugs only if the keyboard, the top part of THEC64 Maxi is in the way, but if you have enough room they can stay plugged in.
DO NOT use a straight pin header cause you will not be able to close the case

No soldering needed here, just stick the pins in and stick them down with black electric tape... or use a elastic band across it.

In the picture above you can see that the UART is on the bottom left side of the board, just above the FEL connector and the pins are from top to bottom vertical on THEC64 maxi board.
(This is the same as on THEC64 Mini)
Connect the UART adapter to the C64 maxi to...
On THEA500 Mini
To connect USB2serial to THEA500 Mini UART you have to solder the wires on its board cause it does not have holes on the UART,
Like in this video:
Now setup THEA500 Mini like THEC64 so set up Putty/USB Stick the same way, more info on THEA500 and how to restore its nandb at the end of the thread.
Connect the UART adapter to THEA500 too...
On THEC64 Mini/Maxi/VIC20 and THEA500
How To Format The USB Stick
Next, it makes sense to format the USB stick first, NOW...
To do this on a Mac:
On a Windows PC:
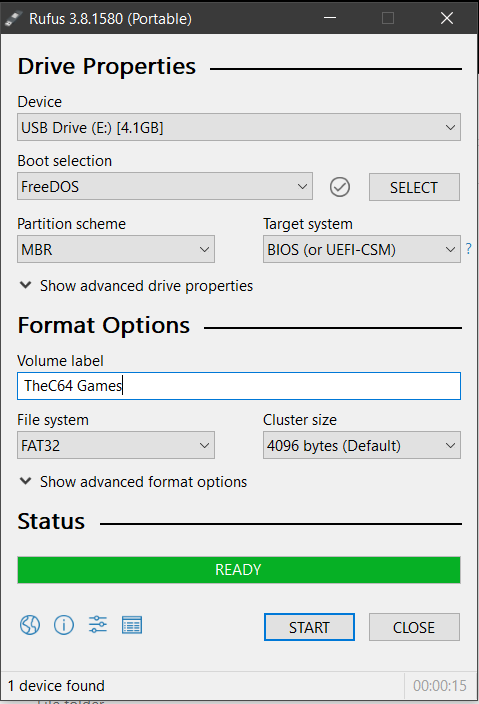
You can then delete the extra files that are on the USB drive and use it for TheC64 Mini/Maxi/THEVIC20 and A500.
Now you can connect the stick to any of the USB ports on the right side of TheC64 Mini/Maxi/THEVIC20 and A500.
Please check for safety's sake that your UART adapter with 3.3V and not 5V (put adapter in the PC in a USB port and with a multimeter to measure the voltage between TxD and GND) The adapter should have a jumper if it can be 3.3V or 5V, make sure it on 3.3V not 5V then you are ready to go.
And now open the Putty program, This is a simple .EXE where nothing needs to be installed, just double click on it. First select Connection Type Serial and then you will be using Serial Line.
Now..
The COM port of your adapter (COM1, COM2, .... COM9) and Speed 115200. Under "Devices and Printers" you can see what kind of COM port the adapter uses, you can look in Device Manger too on Windows 10 to see what COM port the UART uses too.
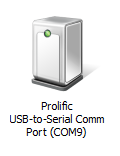
In my case it is port COM9 ... Attention, if you later use another USB port then the COM port will change.
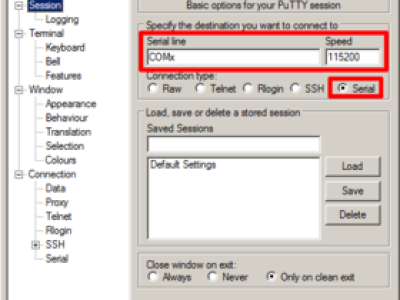
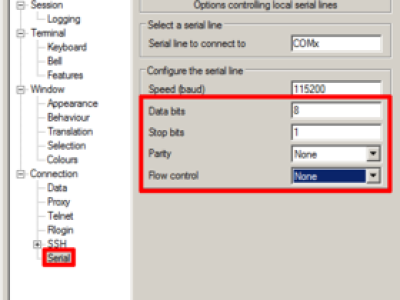
Next you go down to Serial.
Enter the remaining data there. it should already say Serial Line and Speed from before.
Data Bits = 8
Stop Bits = 1
Parity = None
Flow Control = None
On THEC64 Mini/Maxi/VIC20/THEA500 Mini
LOGGING IN WITH PUTTY
Now click on Open box and should get a blank black terminal window with a green cursor in the corner.
The c64 maxi/mini does not need to be connected to a TV or monitor, you only need Putty to be connect to it, and UART of course..
The password is "chuckpeddle", if you have PCUAE on THE A500 Mini and it Autoboots then you can use the same password.
Now log in with login with username `root` and the password `chuckpeddle`, Now you have root access to THEC64 Mini/Maxi, THE VIC 20 and THEA500 if PCUAE is installed...
NAND BACK UP
THEC64 Mini/Maxi/VIC20
Next, I would make a backup copies of the Nand memory and the whole games on the USB stick. You never know if you need it later, you need about 210MB of free space on the stick to copy it over... ^^
Since the guys from Retro Games fiddled with the mount standard, the USB stick has to be integrated a bit differently. As root you are already logged in, enter now the following:
mount /tmp/usbdrive/sda1 /mnt
Then you copy the nand parts to the USB stick with:
cp /dev/nand* /mnt
Then
unmount the USB stick with:
umount /mnt
"shut down" the C64 maxi/mini with typing
poweroff
and unplug the power plug again.
Now you can unplug the USB stick and plug it into your PC and copy the backed up files for save keeping somewhere else.
File system of C64 Maxi/Mini on USB Stick:
- nanda - Linux kernel,
- nandb - root filesystem - ext4 format
You can now add Games, Joysticks or Controllers using PCUAE.
======================================================================================================================
On THEA500
How to Copy Nandb to THEA500 and restore THEA500.
Set up putty like above and the USB Stick the same.
THEA500 Mini nandb is included with A500-nanda-ramfs-enabled in the 7z zip file.
Unzip with 7zip and put A500-nanda-ramfs-enabled and nandb on root of USB stick from 7z file, you can download it here.
Insert USB stick in A500 OTG port, its the port next to the HDMI port
Using the UART serial connection, press s and hold down as you power on A500 and keep it held down until you see it in Putty interrupting uboot
In uboot, Type:
Type one line at a time and then press enter after each line, you might have to press enter twice:
Then type:
Then you should boot into the command prompt and you can load nand.ko, mount the USB stick somewhere
and copy nandb the same way as with THEC64.
To backup nandb:
Mount USB Stick,
and then mount nand.ko and then copy nanb to USB Stick:
Type one line at a time and then press enter after each line, you might have to press enter twice:
Don't overwrite anything on your nand except if you are really sure thats what you want to do.
or to overwrite nandb on THEA500 firmware, to restore the nand:
Mount USB Stick,
and then mount nand.ko and then copy nandb to nandb on THEA500 Firmware:
Type one line at a time and then press enter after each line, you might have to press enter twice:
For nanda change the nandb.img to nanda.img of course.
Thats it for now, next I add how to copy the whole nand if THEA500 still does not work, even if you changed nanda/b.

THEA500 is now added...

EDIT: June 2022
This has been updated for THEC64 Maxi now and it works the same way as if you were doing it on THEC64 Mini, anything that you do on THEC64 Maxi you can do on THE VIC 20 too, all 3 machines are the same machine, THEC64 Maxi and THE VIC 20 are based on THEC64 Mini so uses the same firmware.
I have added how to restore your THEA500 at the end of this thread.
Okay, here's a little tutorial on what you need to do to add a UART and a USB2 Serial (You can add or edit games with PCUAE, the only part that important in this now is the UART part for backing up your nandb or restoring it, more info on restoring your THEC64 nand here.
The following hardware is required:
For THEC64 Mini/Maxi/VIC20 and THEA500.
- An FTDI / UART USB2 Serial adapter.
There are loads on eBay.
WARNING.. ALWAYS GET A USB2SERIAL ADAPTER WITH A JUMPER OR SWITCH BUT NOT ALL CHANGE THE VOLTAGE ON THE RX LINE SO CHECK IT FIRST, MAKE SURE ITS 3.3V.IF ITS AT 5V WHEN CONNECTED TO THEC64 MINI THEN IT WILL BLOW THE UART ON IT.IT MIGHT SEEM TO BE OK BUT THEN THE UART WILL STOP WORKING..THIS INCLUDES THEC64 MAXi TOO.
I know it happened to me with one of my THEC64 Mini's.
Edit 2022: I now use a CP2102 Module USB2Serrial Adapter with TheC64 Mini/VIC20, I used it for my Gotek Drive so I could flash it for the Amiga and its has a pin for 3.3v so this works fine so I recommend it, its RX is 3.3v.
h3droid.com/blog/uart-cable
What I did was... I got a USB2serial with a cable on it like the image below so I could use the cable from it with the CP2102 USB2seral Adapter, its a good idea to do that, the cable that comes with the CP2102 USB2seral Adapter was to short and thats if it comes with one, not all do.


You will need to take the cable off so take apart the USB2Serial with the back cable on it, so unsolder it and then get 3 cables with the jumper connectors on so you can solder wires to each cable on the black cable (Green, White and Black wires) DO Not use the RED wire, its not needed so cut it off so you can not use it, then you can connect the black cable to the CP2102 USB2seral Adapter.
Look here on eBay for a CP2102 USB2Serial Module USB to TTL UART Serial Converter, try to find one with a jump cable ... I HIGHLY RECOMMENED IT...

This is like the one I use, it comes with the jumper cable you need to connect the black cable to.

For THEC64 Mini/Maxi/VIC20
- Pin header 2.54mm RM for the UART connection on the C64 Maxi/Mini board (4 pins) + soldering iron.
Recommend a 90 ° bar, because it is always easy to plug in the connector and you can close THEC64 Mini/Maxi/THEVIC20 case once you have fitted the UART Cable.
When soldering the 4 pin on the C64 Maxi/Mini board do not leave the soldering iron on the pads to long because you could damage the traces on the board and the serial will not work, just about 2 seconds on each pad and solder the pins on, one at a time.
You need a 4 pin header like this below but only really need 3 pins for Rx, Tx and Gnd holes.

- A USB stick with Fat32 and MBR partition / formatted
- A C64 Mini, THEC64 MAXi or THEA500

The following software is required..
- Windows 7,8,10 sorry not for Linux atm.
- Putty (or another Terminal Program)
putty.org
And now we can start...
On THEC64 Mini
First, the C64 mini must be opened, there are 4 screws under the rubber feet. Take care when removing the cover as the cable of the LED is rather short and thin and can break easily. The cable can then be removed from the board, just as the cable that leads to the hidden button in the case - you have to be more careful because its soldered badly, so the cable can come off the button,In case, solder cable again : P
The board is held only by 4 screws on the case and can be unscrewed quickly.
Then you have to solder the pins on the board and then you can screw it back firmly. You do not have to do any more.
Looks like this:


On this picture you can also see how the solder points are from left to right on THEC64 Mini board.
3.3V (POWER - is not needed and must NOT be connected) RxD (Receive Data) TxD (Transmitted Data) GND (GROUND - this is the square soldering point on the board)
Green Cable TxD to RX, White Cable is RxD to TX, Black Cable is GND to GND

On THEC64 MAXi
You need to flip the case over, There are 3 screws in THEC64 Maxi and you need to unscrew them to get to its board.
You don't have to do this, you can still add a Uart with THEC64 Maxi with the keyboard and Led light plugged in, I just say remove the keyboard and LED plugs only if the keyboard, the top part of THEC64 Maxi is in the way, but if you have enough room they can stay plugged in.
DO NOT use a straight pin header cause you will not be able to close the case

No soldering needed here, just stick the pins in and stick them down with black electric tape...
 or use a elastic band across it.
In the picture above you can see that the UART is on the bottom left side of the board, just above the FEL connector and the pins are from top to bottom vertical on THEC64 maxi board.
(This is the same as on THEC64 Mini)
3.3V-->VCC-UARTX (POWER - this is not needed and must NOT be connected)
RxD-->CPUX-URX (Receive Data)
TxD<--CPUX-UTX (Transmitted Data)
GND-->GND (GROUND - this is the square soldering point on the board)
RxD-->CPUX-URX (Receive Data)
TxD<--CPUX-UTX (Transmitted Data)
GND-->GND (GROUND - this is the square soldering point on the board)
Connect the UART adapter to the C64 maxi to...
Green Cable is Tx to CPUX-URX
White Cable is Rx to CPUX-UTX
Black Cable is Ground to GND
White Cable is Rx to CPUX-UTX
Black Cable is Ground to GND
To connect USB2serial to THEA500 Mini UART you have to solder the wires on its board cause it does not have holes on the UART,
Like in this video:
Now setup THEA500 Mini like THEC64 so set up Putty/USB Stick the same way, more info on THEA500 and how to restore its nandb at the end of the thread.
Connect the UART adapter to THEA500 too...
Green Cable is Tx to RX
White Cable is Rx to TX
Black Cable is Ground to GND but you might not need that cause the PC has ground, it can work with 2 wires connected to RX and TX only, like in the video.
On THEC64 Mini/Maxi/VIC20 and THEA500
How To Format The USB Stick
Next, it makes sense to format the USB stick first, NOW...
- It needs to use the partitioning scheme MBR
- The filesystem needs to be FAT32
To do this on a Mac:
On a Windows PC:

You can then delete the extra files that are on the USB drive and use it for TheC64 Mini/Maxi/THEVIC20 and A500.
Now you can connect the stick to any of the USB ports on the right side of TheC64 Mini/Maxi/THEVIC20 and A500.
Please check for safety's sake that your UART adapter with 3.3V and not 5V (put adapter in the PC in a USB port and with a multimeter to measure the voltage between TxD and GND) The adapter should have a jumper if it can be 3.3V or 5V, make sure it on 3.3V not 5V then you are ready to go.
And now open the Putty program, This is a simple .EXE where nothing needs to be installed, just double click on it. First select Connection Type Serial and then you will be using Serial Line.
Now..
The COM port of your adapter (COM1, COM2, .... COM9) and Speed 115200. Under "Devices and Printers" you can see what kind of COM port the adapter uses, you can look in Device Manger too on Windows 10 to see what COM port the UART uses too.

In my case it is port COM9 ... Attention, if you later use another USB port then the COM port will change.

Next you go down to Serial.
Enter the remaining data there. it should already say Serial Line and Speed from before.
Data Bits = 8
Stop Bits = 1
Parity = None
Flow Control = None

On THEC64 Mini/Maxi/VIC20/THEA500 Mini
LOGGING IN WITH PUTTY
Now click on Open box and should get a blank black terminal window with a green cursor in the corner.
The c64 maxi/mini does not need to be connected to a TV or monitor, you only need Putty to be connect to it, and UART of course..

The password is "chuckpeddle", if you have PCUAE on THE A500 Mini and it Autoboots then you can use the same password.
Now log in with login with username `root` and the password `chuckpeddle`, Now you have root access to THEC64 Mini/Maxi, THE VIC 20 and THEA500 if PCUAE is installed...

NAND BACK UP
THEC64 Mini/Maxi/VIC20
Next, I would make a backup copies of the Nand memory and the whole games on the USB stick. You never know if you need it later, you need about 210MB of free space on the stick to copy it over... ^^
Since the guys from Retro Games fiddled with the mount standard, the USB stick has to be integrated a bit differently. As root you are already logged in, enter now the following:
mount /tmp/usbdrive/sda1 /mnt
Then you copy the nand parts to the USB stick with:
cp /dev/nand* /mnt
Then
unmount the USB stick with:
umount /mnt
"shut down" the C64 maxi/mini with typing
poweroff
and unplug the power plug again.
Now you can unplug the USB stick and plug it into your PC and copy the backed up files for save keeping somewhere else.
File system of C64 Maxi/Mini on USB Stick:
- nanda - Linux kernel,
- nandb - root filesystem - ext4 format
You can now add Games, Joysticks or Controllers using PCUAE.
======================================================================================================================
On THEA500
How to Copy Nandb to THEA500 and restore THEA500.
Set up putty like above and the USB Stick the same.
THEA500 Mini nandb is included with A500-nanda-ramfs-enabled in the 7z zip file.
Unzip with 7zip and put A500-nanda-ramfs-enabled and nandb on root of USB stick from 7z file, you can download it here.
Insert USB stick in A500 OTG port, its the port next to the HDMI port
Using the UART serial connection, press s and hold down as you power on A500 and keep it held down until you see it in Putty interrupting uboot
In uboot, Type:
Type one line at a time and then press enter after each line, you might have to press enter twice:
usb reset;fatload usb 0 4007f800 A500-nanda-ramfs-enabledThen type:
setenv bootargs console=ttyS0,115200 root=/dev/nandb init=/init loglevel=9 mem=512M ramfs
Then:boota 4007f800Then you should boot into the command prompt and you can load nand.ko, mount the USB stick somewhere
and copy nandb the same way as with THEC64.
To backup nandb:
Mount USB Stick,
and then mount nand.ko and then copy nanb to USB Stick:
Type one line at a time and then press enter after each line, you might have to press enter twice:
mount /dev/sda1 /mnt
insmod /lib/modules/3.10.65/nand.ko
dd if=/dev/nandb of=/mnt/nandb.img
sync
umount /mnt
Don't overwrite anything on your nand except if you are really sure thats what you want to do.
or to overwrite nandb on THEA500 firmware, to restore the nand:
Mount USB Stick,
and then mount nand.ko and then copy nandb to nandb on THEA500 Firmware:
Type one line at a time and then press enter after each line, you might have to press enter twice:
mount /dev/sda1 /mnt
insmod /lib/modules/3.10.65/nand.ko
dd if=/mnt/nandb.img of=/dev/nandb
sync
umount /mnt
For nanda change the nandb.img to nanda.img of course.
Thats it for now, next I add how to copy the whole nand if THEA500 still does not work, even if you changed nanda/b.


